Caramel Apple Cream Cheese Dip – No BAKE!

Fall is in the Air at My House with this Caramel Cream Cheese Dip
Caramel Apple Cream Cheese Dip

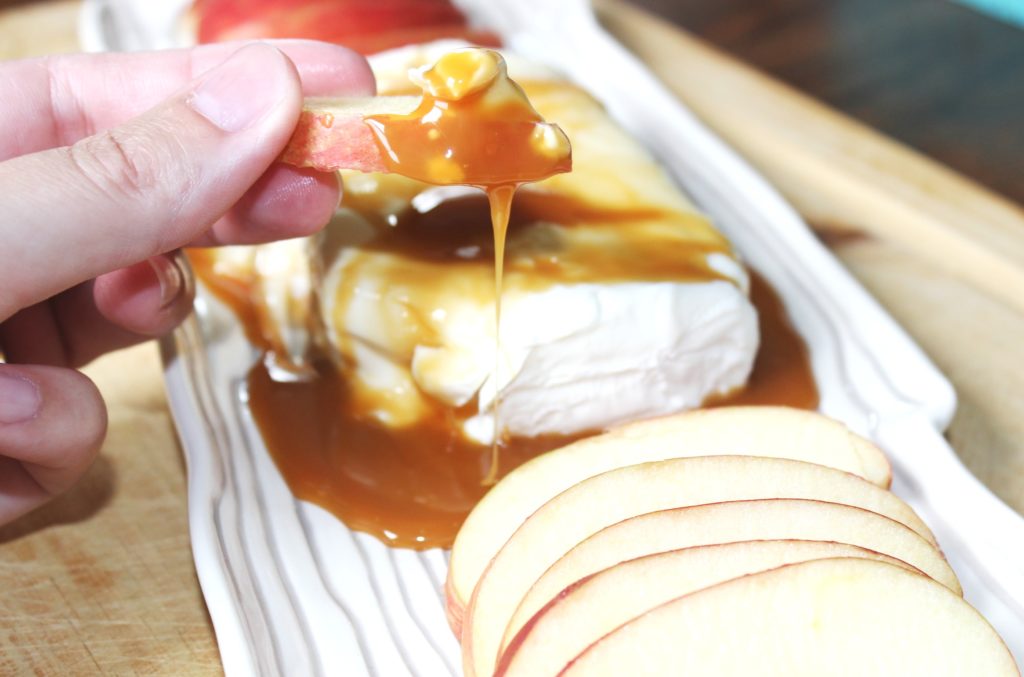
Fall is upon us with this nice cool weather we keep having on and off, it is getting me in the mood for pumpkin cream cheese muffins and Caramel Apple everything! I made this delicious Caramel Apple Cream Cheese Dip the other day, and let me say it is heaven with each dip! I shouldn’t have made it, because I wanted to eat the whole thing it was that good!

For this dip I used a salted caramel, and it really paired nicely with the cream cheese. Dip your apple or other fruits you want and just dig in to the creamy goodness! I truly love this dip, and it would be great for any season, I just think it is perfect for Fall gatherings!

Caramel Dip

I am in full fledge prep mode for Clay’s Birthday coming up! We went outside and had a photo shoot for his invitations I will be creating here, and getting in the mail soon! We have a lot of decorations bought, I just can’t wait! It will be a perfect day I am sure! When we came in from pictures, I thought to make this dip as a snack for us. Clay really loved the cream cheese part of it, and much on the apples some!

Caramel Apple Cream Cheese Dip – Perfect for FALL

Ingredients

  • 1 block of cream cheese
  • 1 jar of caramel sauce I used Salted Caramel (you can make homemade sauce)
  • Apples or other fruit

Instructions

  1. Take your block of cream cheese and let it get to room temperature.
  2. With a spoon drizzle some of the caramel sauce over the cream cheese until you reach as much as you want on the block.
  3. Cut up your fruit or cookies and dip or spread to enjoy!
  4. Refrigerate after you are done eating on it, if you have any left!!
Schema/Recipe SEO Data Markup by Yummly Rich Recipes
https://themavensisters.com/caramel-apple-cream-cheese-dip-no-bake/

Caramel Apple Dip

Okay so this recipe, kind of isn’t a full fledge recipe, as it is so easy! BUT I had to share it in case you had never tried this! I know it is fabulous and so easy to whip up, that everyone will love it to pieces!

Easy Homemade Peach Cobbler

The Best Peach Cobbler Ever

easy homemade peach cobbler

As far as desserts are concerned, there is nothing better than fresh Easy Homemade Peach Cobbler. Top it with some ice cream and you can’t help but moan when you bite into it. This is by far my favorite Homemade Peach Cobbler recipe. It’s been keeping my family happy for years.

With fall on the horizon, fresh peaches and other fruits are making their appearance in our town. Our community did a fundraiser and had a bunch of cases of peaches sent in to sell. When I heard there were going to be fresh peaches, I almost did a back flip! We don’t usually get really good peaches in our grocery store, so when they are brought to town it’s something to get excited about.

This recipe calls for fresh peaches. You could certainly use frozen ones if that is all you have available, but I promise it won’t be as tasty.  Making it with frozen peach is still going to be a lot better than not making it at all! No matter what you use you will love this Easy Homemade Peach Cobbler.

best peach cobbler recipe

How to Blanch Peaches

In case you have never blanched peaches, I thought I better give you some instructions in case you are just starting out. I used to freak out just hearing the word “blanching.”  I figured it was some long and drawn process, but it is really easy. First get out a big pot and boil some water. I like to cut an “X” on the bottom of the peach, just enough to break the skin. Then put your peaches in the boiling water. Let them boil for 1 – 2 minutes. After you are done boiling, drop the peaches in a large bowl filled with ice water. I let them sit for around 45 seconds to a minute then I start pealing the skins off. You will be surprised by how easy the skin just falls off.  You can also use this method to blanch other fruits and vegetables.

Easy Homemade Peach Cobbler

Ingredients

  • 8 fresh peaches - skin removed and sliced into 1-2 inch pieces depending on your preference
  • 1/4 cup white sugar
  • 1/4 cup brown sugar
  • 3/4 teaspoon cinnamon
  • 2 teaspoons cornstarch
  • 1 teaspoon lemon juice (fresh or concentrate)
  • Topping Ingredients
  • 1 cup all-purpose flour
  • 1/4 cup white sugar
  • 1/4 cup brown sugar
  • 3/4 teaspoon baking powder
  • 1/2 teaspoon salt
  • 6 tablespoons unsalted butter
  • 1/4 cup boiling water (I use the water that I blanched the peaches with)

Instructions

  1. Preheat Oven to 425 degrees
  2. Mix peaches, 1/4 cup sugar, 1/4 cup brown sugar, 3/4 teaspoon cinnamon, cornstarch and lemon juice.
  3. Bake peaches for 10 minutes.
  4. Cut up your butter into small chunks.
  5. Mix all topping ingredients. I use my fingers to blend it together and make a crumbly topping.
  6. Remove peaches from oven and sprinkle crumble topping all over peaches. I like to sprinkle a little extra cinnamon on and sugar on the very top.
  7. Bake for 30 minutes or until the top is golden.
Schema/Recipe SEO Data Markup by Yummly Rich Recipes
https://themavensisters.com/easy-homemade-peach-cobbler/

I hope your family falls in love with this peach cobbler like ours has. It’s a great go to recipe for family functions and events too. Once it’s gone you will always be wanting more! Happy Baking!

Easy Crowd Pleasing Party Mix

Keep Your Guests Happy With this 3 Ingredient Party Mix

Candy Corn Snack Mix

Never disappoint with this Easy Crowd Pleasing Party Mix! There are only 3 ingredients and you are sure to keep your guests happy and coming back for more.  Many years ago, during my days of working at Farm Bureau, my mentor would bring in this Easy Crowd Pleasing Party Mix as a special treat. We would always grab little paper cups and fill them with this delicious mix and eat until we were miserable! I loved every minute of it!

Now that my Farm Bureau days are long gone, I didn’t want this Easy Crowd Pleasing Party Mix to be gone too. So, every once in a while I make this special treat for my family. I can’t make it very often because we have no self control when it comes to it. As I am typing this I am literally thinking about getting my next helping!

Easy Halloween Food Party Ideas

This Easy Crowd Pleasing Party Mix is great for office, school or daycare parties. Assuming you are allowed to bring products with peanuts in them. If not, you can always omit the peanuts and replace them with something else you prefer. One of the great things about this mix is that you can make so many different variations of it. Some things I recommend adding are: marshmallows, chocolate chips, pretzels, chocolate covered pretzels, peanut M&M’s, peanut butter M&M’s, peanut butter chips, candy pumpkins, cashews, almonds, popcorn or really anything else you can think of. You can’t go wrong with customizing it to your tastes.

Easy Crowd Pleasing Party Mix

Ingredients

  • Bag of M&M candies (16 oz)
  • Jar of Dry Roasted Peanuts (16 oz)
  • 2 Bags of Candy Corn (6 oz)

Instructions

  1. Mix all ingredients in plastic container with a lid. Store in airtight container.
Schema/Recipe SEO Data Markup by Yummly Rich Recipes
https://themavensisters.com/easy-crowd-pleasing-party-mix/

Hope you enjoy making this easy mix and can adjust it to your liking. Your friends and family will be begging you for more, I promise!

Pumpkin And Cream Cheese Swirl Muffins Recipe – Melts in your mouth

Try These To Die For Pumpkin and Cream Cheese Swirl Muffins

Pumpkin Muffins with Cream Cheese One thing I know is Fall couldn’t come fast enough for me! I finally decided it is close enough to September to whip out some pumpkin recipes! I am head over heels in love with these pumpkin and cream cheese swirl muffins! Y’all, if you love pumpkin and cream cheese, then you will love these beauties!

Pumpkin and cream cheese are like a match made in heaven, and I just had to get a little pumpkin fix! Granted pumpkin doesn’t have to be narrowed down to one season, so today is the day! I had a can of pumpkin puree staring at me, and these beauties are what I created!

pumpkin muffins with a cream cheese swirl

What I love about these muffins is the light pumpkin flavor they have, and then the little bit of cream cheese swirl on top really adds a whole new creamy texture to the muffins! They are so moist, I truly love these pumpkin muffins! What I did was bake them all up, allow them to cool completely then I tossed them all in the freezer! That way I can grab and zap in the microwave for morning time, and they take like new! They freeze and reheat beautifully! Now if you don’t want to freeze them just store in a air tight container in the fridge!

 KitchenAid 4.5-Quart Classic Series Stand Mixer, Onyx Black

&

I use my KitchenAid Mixer when I make these, and then when I go to do the cream cheese mixture I rinse out my bowl and then use it It really makes the whole process so much easier, and we all know I don’t have a ton of time!!

Pumpkin Muffins with A Swirl of Cream Cheese 

pumpkin muffins with cream cheese

So enough chatter from me, lets get on to the recipe! They are pretty easy to make just do your pumpkin batter then a separate bowl for your cream cheese batter, and pour and bake!

Pumpkin And Cream Cheese Swirl Muffins Recipe – Melts in your mouth

Ingredients

  • FOR MUFFINS:
  • 1 Can of pumpkin puree 15 ounce
  • 1 cup sugar
  • 1/2 cup packed brown sugar
  • 2 eggs
  • 1/2 cup canola oil
  • 2 tablespoons vanilla extract
  • 1 3/4 cup flour
  • 2 tablespoons pumpkin spice
  • 1 teaspoon baking soda
  • 1/2 teaspoon salt
  • Filling:
  • 8 oz cream cheese (room temperature)
  • 1/4 cup granulated sugar
  • 1 large egg yolk
  • 2 teaspoons vanilla extract

Instructions

  1. First off preheat your oven to 375 degrees. While it is warming up, take your flour, baking soda, pumpkin spice, and salt and mix in a little bowl and set aside.
  2. In a KitchenAid Mixer or bowl if you don't have mixer, mix the brown sugar, granulated sugar, oil, eggs, and vanilla together.
  3. Once well mixed, slowly add the dry ingredients in until well mixed.
  4. Spoon out your pumpkin batter into muffin tins. Fill about 3/4 full.
  5. In a separate bowl mix your filling ingredients until fluffy.
  6. Then add a dollop on each muffin, and grab a toothpick and swirl it around. It will make the muffins look pretty when they are baked!
  7. Bake for 18-23 minutes. Mine took right at 18 but depending on where you live the cook time can vary.
  8. Enjoy, if you don't eat them right away store in a air tight container in the fridge.
Schema/Recipe SEO Data Markup by Yummly Rich Recipes
https://themavensisters.com/pumpkin-cream-cheese-swirl-muffins-recipe/

These muffins are a crowd pleaser for sure! I know we will be making more of these to have on hand! Clay absolutely loves them! I am all about baking and freezing goodies for the ease of it!


What is your favorite pumpkin recipe? 


Crockpot No Bake Cookies – Simple to Whip Up!

Crockpot No Bake Cookies

When it comes to cookies I am not picky, I love them all, but my favorite are no bake cookies! I love the chocolate and peanut butter paired with oatmeal, it is the perfect combination! I wanted to share a fun new way to make no bakes, here is a crockpot no bake cookie recipe, I think you guys might enjoy!

Don’t own a crockpot? Then head over and buy one here!

I really love how easy it is to toss the ingredients into your crockpot and just let it do it’s magic, then stir and drop your cookies onto wax paper and your done! It is simple and painless and let me say the reward is worth it! 

If you are wondering how this compares to the classic stove top no bake cookies, it is very similar! I found that the flavors were very close to the same. The texture was ever so slightly different, but not enough to really worry about! I think to me this is a winner recipe for ease and taste, and we will be making more of these in the future! I love to make these up and then freeze them, so if I am craving some sweet I can pull one or two out of the freezer to munch on!

Chocolate No Bake Cookies 

no bake cookies

With this recipe, you whip up the wet ingredients, toss in the bottom of the crockpot, then sprinkle the oats on top DO NOT STIR THEM IN), and dollop the peanut butter dab in the center and turn to high to cook. Within 1 hour to 1 1/2 hours when it bubbles on the sides, you turn off, add your vanilla and stir then drop the cookies on to wax paper to set up. It is so easy, I mean genius! If you are not good at baking this is kind of fool-proof which is awesome! 

Crockpot No Bake Cookies – Simple to Whip Up!

Ingredients

  • 1 stick of butter softened
  • 1/2 cup Milk
  • 1 cup sugar
  • 1 3/4 cup powdered sugar
  • 1/2 cup cocoa
  • 1 tbs vanilla extract
  • 3 cups quick oats
  • 1/2 cup peanut butter (creamy or crunchy, whatever you prefer)

Instructions

  1. First off you want to grab a bowl and mix up the milk, softened butter that is room temperature, sugars, and cocoa powder.
  2. Once well mixed pour into your crockpot, then pour your oats over the top, do not mix oats in! Then dollop the peanut butter in the center of the crockpot on top of oatmeal.
  3. Turn to high and cook for 1 hour to 1 1/2 hours or until the chocolatey part is bubbling. Mine took 1 hour but each crockpot heats differently so time varies.
  4. Once it is done, add in your vanilla extract and stir the mixture well, and spoon onto wax paper and let cookies set up!
Schema/Recipe SEO Data Markup by Yummly Rich Recipes
https://themavensisters.com/crockpot-no-bake-cookies/

simple crockpot no bake cookies

Easy peasy like I said, and super delicious! I hope you all enjoy this recipe, and make sure to check out all the other recipes we have up for grabs!

Heavenly Double Chocolate Banana Muffins

Chocolate Lovers Dream with these Double Chocolate Banana Muffins

chocolate banana muffins recipe

If you are craving something that is chocolaty and will knock your socks off, try these Heavenly Double Chocolate Banana Muffins.  It’s a rainy day at my house and I have been searching the cub bards for some chocolate. As I was searching I realized that I had 3 ripe banana’s that needed tended to. So, I whipped up these amazing and Heavenly Double Chocolate Banana Muffins.

I need to back up a little and give a little history on my husband and I. Doug and I have been married for 14 years and we have a little running joke. I always buy bananas and tell him not to throw them out because I am going to make banana bread. He always laughs and says, “yeah right.” Then several days pass and I end up throwing them out without making anything banana related.  Of course, he always asks me “where is that banana bread you were going to make???”  I just laugh at him. I have made banana bread and muffins over the years, but not near as often as I purchase them and let them ripe only to toss them out! Recently, I learned you can toss your ripened bananas into the freezer and this will help me not waste them.

chocolate chip banana muffins recipe

Okay back to these delicious double chocolate muffins! Now these are very rich muffins, so you can usually get by eating just one. I like to change the recipe up here and there. They are very good if you replace the chocolate chips with peanut butter chips. You can also add walnuts or pecans to have that little bit of a crunch. I like to add applesauce to the recipe, because I love how moist it makes them. If you aren’t a fan of the applesauce you can always exchange it for the same amount of oil. (1/2 cup) Make whatever changes you like and fall in love with these Heavenly Double Chocolate Banana Muffins.

Heavenly Double Chocolate Banana Muffins

Ingredients

  • 3 medium ripened bananas
  • 3/4 cup brown sugar
  • 1/2 cup applesauce (or oil if you would rather)
  • 1 tsp vanilla
  • 1 large egg
  • 1 c. flour
  • 1/2 cup cocoa (I prefer Hershey's)
  • 1 tsp baking soda
  • 1/2 tsp salt
  • 1 1/4 cup chocolate chips Semi-sweet (reserve 1/4 cup for topping muffins)

Instructions

  1. Preheat oven to 350 degrees.
  2. Mash bananas.
  3. Mix bananas, brown sugar, applesauce, vanilla and beaten egg.
  4. In a separate bowl, mix flour, cocoa, salt and baking soda.
  5. Add the dry ingredients to the wet ingredients and mix.
  6. Add 1 cup chocolate chips.
  7. Line muffin tin with cupcake liners and fill 3/4 full.
  8. Sprinkle 1/4 cup of chocolate chips on top.
  9. Bake for 15 - 17 minutes or until toothpick comes out clean.
Schema/Recipe SEO Data Markup by Yummly Rich Recipes
https://themavensisters.com/heavenly-double-chocolate-banana-muffins/

Crockpot Rice Pudding – So Delicious and Baby Approved!


rice pudding I use my crockpot a lot, it makes life easier to toss stuff in, turn to low and leave for the day, then dinner is made for the night. But, I have began to venture out and try new recipes that are desserts like this crockpot rice pudding! It is really delicious and I love the hint of vanilla and cinnamon in it. Really hits your taste buds nicely! Growing up we ate rice and raisins a lot for breakfast, and had rice pudding here and there, it was always a treat. I wanted to make this and see what Clay thought, cause I love having memories of my past to be able to carry on to Clay!

crockpot rice pudding

The rice pudding turned out amazing and when it was done I spooned into individual containers and served it nice and warm. I love to dust it with a little cinnamon on top, it adds a new dimension of flavor to it, and looks really pretty! This recipe is really good. Now it isn’t very creamy, it is more milky, you want that milk mixture in your bites because it is full of sweetness! I think if it were cooked in the oven, you would get that creamy flavor but crockpot cooking always changes the texture of foods, I have found. 

clay pudding

Clay found this recipe to be a winner, he actually was wanting more of it. It was a little surprising as he tends to be a little indifferent with new foods, so I take this as a win! I will for sure be making the recipe over and over through the years, it will be an easy recipe to teach Clay to do when he gets older!

Rice Pudding Recipe

Crockpot Rice Pudding

Prep Time: 10 minutes

Cook Time: 4 hours

Ingredients

  • 2 Cups Minute Rice
  • 5 Cups Milk ( I prefer whole milk)
  • 1 tbs
  • 1tsp cinnamon
  • 1/4 tsp salt
  • 1/2 cup sugar
  • 1/2 tsp vanilla extract

Instructions

  1. First off you want to take the butter and rub it around the side and bottom of the crockpot, set the leftover butter to the side.
  2. Then pour in all the ingredients except leftover butter and stir gently. Cut up the leftover butter and place on top of the mixture.
  3. Turn the crockpot to low, and let cook 3-4 hours. You will know it is ready when the rice is cooked.
  4. Serve, with a sprinkle of cinnamon if you would prefer.
Schema/Recipe SEO Data Markup by Yummly Rich Recipes
https://themavensisters.com/crockpot-rice-pudding/

So quick and easy for prep time, and it doesn’t take that long to cook. It makes your house smell amazing. I do recommend this yummy recipe to all those who love rice! I think you will enjoy the flavors and ease of making it!


No Bake Cookie Bites

Enjoy Some Delicious No Bake Cookie Bites

No Bake Cookie Bites

Cure that sweet tooth craving with these easy No Bake Cookie Bites! I have a huge sweet tooth and chocolate is my absolute favorite. There are many recipes out there, but I experimented to see if I could find a perfect recipe for my household.

These No Bake Cookie Bites are the easiest treats to make! They are perfect for an everyday snack, a birthday party or an energy boost while hiking! The are packed with lots of fiber and just enough sweet goodness to keep your taste buds happy and begging for more.

Easy Cookie Bites

As you can see, even Haydyn loves them! She seems to have an intuition when I start gathering the ingredients to make this recipe. She runs to the kitchen and is begging for some before I am even done. I can’t blame her, because I like to eat a little before I actually refrigerate them too! It’s pretty safe to say that the apple doesn’t fall far from the tree there.

What I love about these super easy cookie bites is that you can do so many things with them. The recipe I am posting is my absolute favorite and the one I make most often, but below are some variations you make like. Just replace the m&m’s and semi-sweet chocolate chips for the following:

Dried cranberries and white chocolate

Milk Chocolate Chips and Peanut Butter Chips

Butterscotch chips and chocolate chips

Peanuts and chocolate chips

Almonds and dried cranberries

Sunflower seeds and chocolate chips

No Bake Cookie Bites

Ingredients

  • 1 1/2 cups of oatmeal (old fashioned or minute oats)
  • 3/4 cup of peanut butter (I use Jif but you can use your favorite)
  • 1/3 cup honey
  • 2 tsp of vanilla
  • 1/2 cup ground flax seed
  • 1/3 cup m&m's
  • 1/3 cup semi-sweet chocolate chips

Instructions

  1. Mix all ingredients in a medium sized bowl with a wooden spoon. After mixed well, refrigerate for 1 hour. Roll into balls and enjoy! I like to keep mine refrigerated all the time and eat them cold.
Schema/Recipe SEO Data Markup by Yummly Rich Recipes
https://themavensisters.com/no-bake-cookie-bites/

These are are very filling and satisfying. You can sneak extra nutrients in and your family won’t even know or have time to object. Now it’s up to you to figure out what your favorite recipe is!

Strawberry Poke Cake

Classic Strawberry Poke Cake

Strawberry Poke Cake

If you are looking for a refreshing and tasty dessert, you should make a Classic Strawberry Poke Cake!  I remember being a kid and going to Grandma’s and having this Classic Strawberry Poke Cake! I always wanted it, but never knew how and then several years ago my husband asked me to make it. I started asking around and found out this is literally the easiest cake ever to make!  If you don’t make this cake, you are missing out!


family

I decided to make the Strawberry Poke Cake this year for the 4th of July. As you can see in the photo above, I attempted to take a photo of my amazing family. I had a fantasy of providing you with an awesome 4th of July family portrait with all of us in our 4th gear, but this is the best I could get!  With Haydyn having a meltdown and my husband not wanting to be in the photo it’s a good thing we had some yummy cake to keep us happy for dinner!

Okay, back to that delicious cake! The best part about this cake is that you refrigerate it, so it is so nice and cold with each amazing bite.  Another great thing about the cake is that you can personalize it to meet your tastes. I use strawberry jello and add strawberries, but you could easily replace it with orange, cherry or anything else you like!

There are also many things you can do to spruce of the frosting if you want. I prefer good old fashion whip cream, but you may want to add some cream cheese to it or some fresh strawberries sent through the food processor.  No matter what you choose, I’m sure you won’t be disappointed!

Strawberry Poke Cake

Ingredients

  • 1 box of Duncan Hines white cake mix
  • 1 (3 oz.) box of strawberry jello
  • 1 cup of boiling water
  • 1 (8 oz.) tub of cool whip
  • Fresh fruit like strawberries or blueberries (optional)

Instructions

  1. Follow the directions on the box of cake mix and prepare as recommended. When cake is almost done baking, boil your cup of water and dissolve the strawberry jello in the water. When the cake is done, poke holes with a fork all over while it's still hot. Then pour your jello all over the top of the cake and allow to cool. Once cooled, put your cook whip all over the top. Add fresh fruit to the top if desired and place in the fridge. I like to refrigerate for at least 3 hours before eating. Enjoy!
Schema/Recipe SEO Data Markup by Yummly Rich Recipes
https://themavensisters.com/strawberry-poke-cake/


Simple Homemade Banana Bread

Calling all Banana Lovers, here is a great Simple Banana Bread Recipe
Simple Homemade Banana Bread

I am a huge banana lover, so I am always up for making a delicious and simple homemade banana bread when I get a chance! Adam, is not a fan of bananas, but it seems that Clay likes them, so we can enjoy all the banana bread together now! I had some bananas getting brown, so I thought what a perfect time to whip up some banana bread.

I am excited for later today at snack time, for Clay to try it and see if he likes it. He is really starting to experiment with foods now, so it will be his first time eating it. So far he really loves his breads, just like his mommy! I craved bread a ton when I was pregnant with him!

Easy Homemade Banana Bread

Easy Homemade Banana Bread

This is a really easy bread recipe, and you can also add in chocolate chips, nuts, or other dried fruits if you would like. I just did a basic recipe today, and maybe introduce chocolate to Clay at a later date! This does make a little bit of a smaller loaf, so it is great if you are not wanting a ton. It doesn’t rise incredibly high like some recipes do. 

Simple Homemade Banana Bread

Ingredients

  • 3 ripe bananas (peeled and mashed)
  • 1/3 cup melted margarine
  • 1 cup sugar (you can do 3/4 cup if you want less sweet)
  • 1 egg
  • 1 1/2 cups all purpose flour
  • 1 tsp baking soda
  • 1/4 tsp salt
  • 1 tsp vanilla extract
  • OPTIONAL - NUTS or Chocolate Chips ( I would do 1/2 cup if you want to add them)

Instructions

  1. Preheat oven to 350 degrees. I used my KitchenAid Stand Mixer, peeled the bananas, and let the machine mash up my bananas on low. If you don't have a mixer, then take a fork and mash them really good.
  2. Then you will want to add in the melted butter, sugar, and beaten egg.
  3. In a small bowl, put your flour, baking soda, and salt. Mix that well, and then slowly add dry ingredients into the mixer with wet.
  4. Lastly add in your vanilla extract.
  5. Once it is well mixed, you can mix in nuts or chips if you want. Then pour into a greased loaf pan and bake for around 45-1 hour.
  6. You want the top to be golden brown, and when you stick a toothpick through it comes out clean, or with little crumbs.
Schema/Recipe SEO Data Markup by Yummly Rich Recipes
https://themavensisters.com/simple-homemade-banana-bread/

simple homemade banana bread

I really love how this is a nice moist bread. You just have to make sure not to over-bake it or that will make it dry. I hope if you make it you all enjoy it like we are!


Hope you all have a great rest of your week, and weekend!