Crockpot No Bake Cookies – Simple to Whip Up!

Crockpot No Bake Cookies

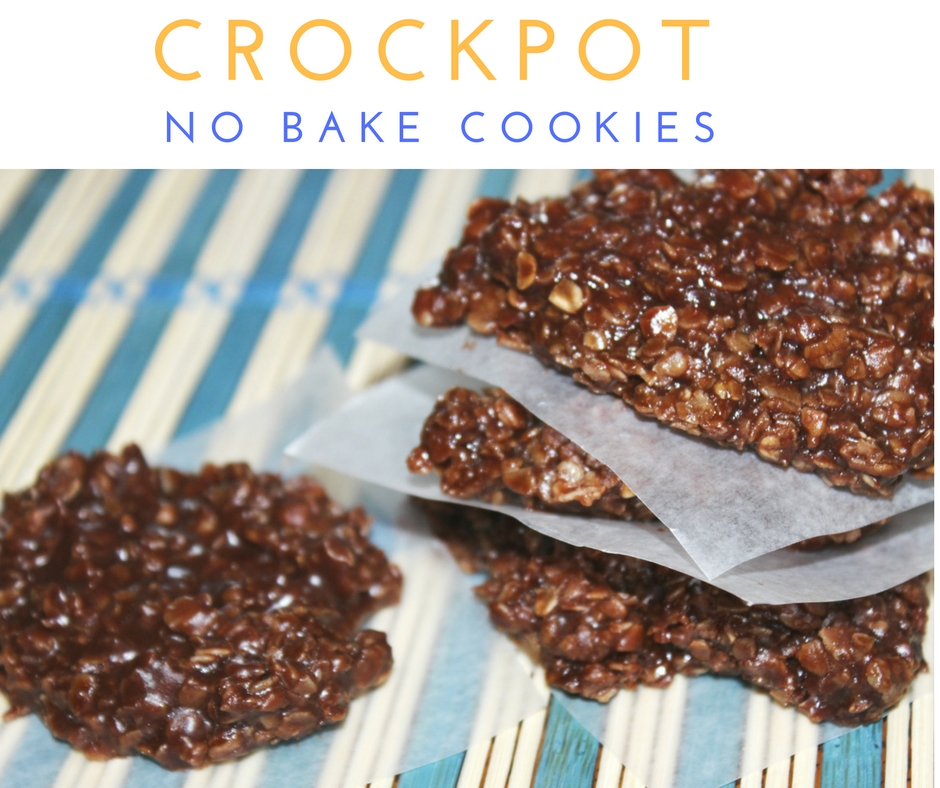
When it comes to cookies I am not picky, I love them all, but my favorite are no bake cookies! I love the chocolate and peanut butter paired with oatmeal, it is the perfect combination! I wanted to share a fun new way to make no bakes, here is a crockpot no bake cookie recipe, I think you guys might enjoy!

Don’t own a crockpot? Then head over and buy one here!

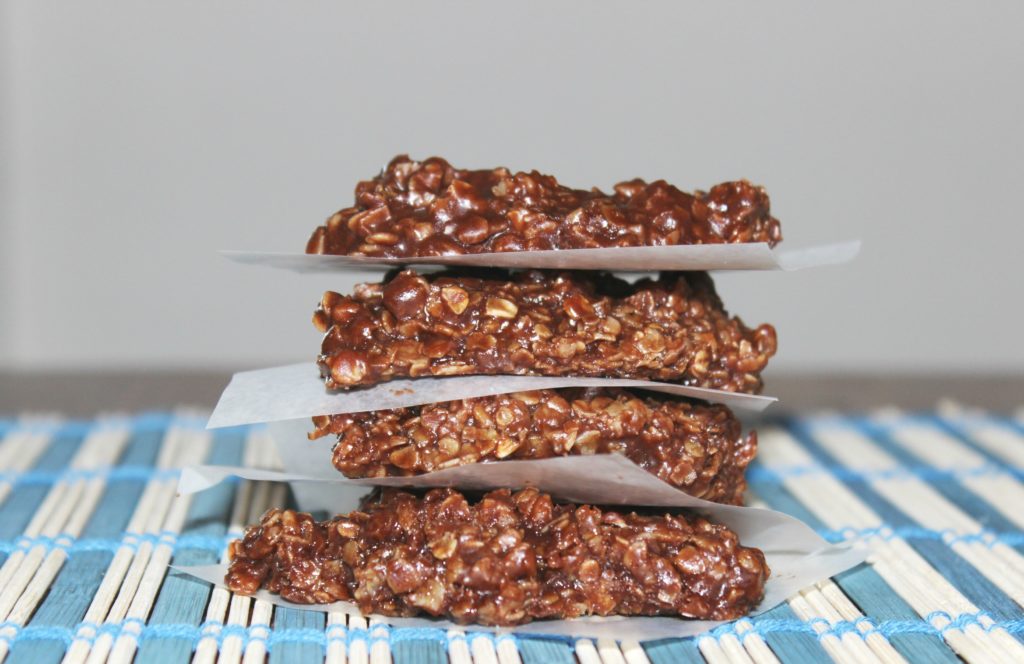
I really love how easy it is to toss the ingredients into your crockpot and just let it do it’s magic, then stir and drop your cookies onto wax paper and your done! It is simple and painless and let me say the reward is worth it! 

If you are wondering how this compares to the classic stove top no bake cookies, it is very similar! I found that the flavors were very close to the same. The texture was ever so slightly different, but not enough to really worry about! I think to me this is a winner recipe for ease and taste, and we will be making more of these in the future! I love to make these up and then freeze them, so if I am craving some sweet I can pull one or two out of the freezer to munch on!

Chocolate No Bake Cookies 

no bake cookies

With this recipe, you whip up the wet ingredients, toss in the bottom of the crockpot, then sprinkle the oats on top DO NOT STIR THEM IN), and dollop the peanut butter dab in the center and turn to high to cook. Within 1 hour to 1 1/2 hours when it bubbles on the sides, you turn off, add your vanilla and stir then drop the cookies on to wax paper to set up. It is so easy, I mean genius! If you are not good at baking this is kind of fool-proof which is awesome! 

Crockpot No Bake Cookies – Simple to Whip Up!

Ingredients

  • 1 stick of butter softened
  • 1/2 cup Milk
  • 1 cup sugar
  • 1 3/4 cup powdered sugar
  • 1/2 cup cocoa
  • 1 tbs vanilla extract
  • 3 cups quick oats
  • 1/2 cup peanut butter (creamy or crunchy, whatever you prefer)

Instructions

  1. First off you want to grab a bowl and mix up the milk, softened butter that is room temperature, sugars, and cocoa powder.
  2. Once well mixed pour into your crockpot, then pour your oats over the top, do not mix oats in! Then dollop the peanut butter in the center of the crockpot on top of oatmeal.
  3. Turn to high and cook for 1 hour to 1 1/2 hours or until the chocolatey part is bubbling. Mine took 1 hour but each crockpot heats differently so time varies.
  4. Once it is done, add in your vanilla extract and stir the mixture well, and spoon onto wax paper and let cookies set up!
Schema/Recipe SEO Data Markup by Yummly Rich Recipes
https://themavensisters.com/crockpot-no-bake-cookies/

simple crockpot no bake cookies

Easy peasy like I said, and super delicious! I hope you all enjoy this recipe, and make sure to check out all the other recipes we have up for grabs!

Heavenly Double Chocolate Banana Muffins

Chocolate Lovers Dream with these Double Chocolate Banana Muffins

chocolate banana muffins recipe

If you are craving something that is chocolaty and will knock your socks off, try these Heavenly Double Chocolate Banana Muffins.  It’s a rainy day at my house and I have been searching the cub bards for some chocolate. As I was searching I realized that I had 3 ripe banana’s that needed tended to. So, I whipped up these amazing and Heavenly Double Chocolate Banana Muffins.

I need to back up a little and give a little history on my husband and I. Doug and I have been married for 14 years and we have a little running joke. I always buy bananas and tell him not to throw them out because I am going to make banana bread. He always laughs and says, “yeah right.” Then several days pass and I end up throwing them out without making anything banana related.  Of course, he always asks me “where is that banana bread you were going to make???”  I just laugh at him. I have made banana bread and muffins over the years, but not near as often as I purchase them and let them ripe only to toss them out! Recently, I learned you can toss your ripened bananas into the freezer and this will help me not waste them.

chocolate chip banana muffins recipe

Okay back to these delicious double chocolate muffins! Now these are very rich muffins, so you can usually get by eating just one. I like to change the recipe up here and there. They are very good if you replace the chocolate chips with peanut butter chips. You can also add walnuts or pecans to have that little bit of a crunch. I like to add applesauce to the recipe, because I love how moist it makes them. If you aren’t a fan of the applesauce you can always exchange it for the same amount of oil. (1/2 cup) Make whatever changes you like and fall in love with these Heavenly Double Chocolate Banana Muffins.

Heavenly Double Chocolate Banana Muffins

Ingredients

  • 3 medium ripened bananas
  • 3/4 cup brown sugar
  • 1/2 cup applesauce (or oil if you would rather)
  • 1 tsp vanilla
  • 1 large egg
  • 1 c. flour
  • 1/2 cup cocoa (I prefer Hershey's)
  • 1 tsp baking soda
  • 1/2 tsp salt
  • 1 1/4 cup chocolate chips Semi-sweet (reserve 1/4 cup for topping muffins)

Instructions

  1. Preheat oven to 350 degrees.
  2. Mash bananas.
  3. Mix bananas, brown sugar, applesauce, vanilla and beaten egg.
  4. In a separate bowl, mix flour, cocoa, salt and baking soda.
  5. Add the dry ingredients to the wet ingredients and mix.
  6. Add 1 cup chocolate chips.
  7. Line muffin tin with cupcake liners and fill 3/4 full.
  8. Sprinkle 1/4 cup of chocolate chips on top.
  9. Bake for 15 - 17 minutes or until toothpick comes out clean.
Schema/Recipe SEO Data Markup by Yummly Rich Recipes
https://themavensisters.com/heavenly-double-chocolate-banana-muffins/

Crockpot Rice Pudding – So Delicious and Baby Approved!


rice pudding I use my crockpot a lot, it makes life easier to toss stuff in, turn to low and leave for the day, then dinner is made for the night. But, I have began to venture out and try new recipes that are desserts like this crockpot rice pudding! It is really delicious and I love the hint of vanilla and cinnamon in it. Really hits your taste buds nicely! Growing up we ate rice and raisins a lot for breakfast, and had rice pudding here and there, it was always a treat. I wanted to make this and see what Clay thought, cause I love having memories of my past to be able to carry on to Clay!

crockpot rice pudding

The rice pudding turned out amazing and when it was done I spooned into individual containers and served it nice and warm. I love to dust it with a little cinnamon on top, it adds a new dimension of flavor to it, and looks really pretty! This recipe is really good. Now it isn’t very creamy, it is more milky, you want that milk mixture in your bites because it is full of sweetness! I think if it were cooked in the oven, you would get that creamy flavor but crockpot cooking always changes the texture of foods, I have found. 

clay pudding

Clay found this recipe to be a winner, he actually was wanting more of it. It was a little surprising as he tends to be a little indifferent with new foods, so I take this as a win! I will for sure be making the recipe over and over through the years, it will be an easy recipe to teach Clay to do when he gets older!

Rice Pudding Recipe

Crockpot Rice Pudding

Prep Time: 10 minutes

Cook Time: 4 hours

Ingredients

  • 2 Cups Minute Rice
  • 5 Cups Milk ( I prefer whole milk)
  • 1 tbs
  • 1tsp cinnamon
  • 1/4 tsp salt
  • 1/2 cup sugar
  • 1/2 tsp vanilla extract

Instructions

  1. First off you want to take the butter and rub it around the side and bottom of the crockpot, set the leftover butter to the side.
  2. Then pour in all the ingredients except leftover butter and stir gently. Cut up the leftover butter and place on top of the mixture.
  3. Turn the crockpot to low, and let cook 3-4 hours. You will know it is ready when the rice is cooked.
  4. Serve, with a sprinkle of cinnamon if you would prefer.
Schema/Recipe SEO Data Markup by Yummly Rich Recipes
https://themavensisters.com/crockpot-rice-pudding/

So quick and easy for prep time, and it doesn’t take that long to cook. It makes your house smell amazing. I do recommend this yummy recipe to all those who love rice! I think you will enjoy the flavors and ease of making it!


Easy Homemade Taco Seasoning

Super Easy Taco Seasoning You Can Use in Lots of Recipes

I don’t know about you, but I like to save money by making my own homemade food like my Easy Homemade Taco Seasoning.  In this fast paced world we live in, it’s so easy to just live off of processed food. I am guilty of this from time to time myself. A few years ago, I decided to try to make some of my own seasonings. I was so surprised by how easy it is and how much more flavorful our food is!

Easy Homemade Taco Seasoning

My family absolutely loves any food that is mexican. We could live off of tacos and be completely content. Okay, I would still need chocolate to survive, but we could almost survive off of tacos alone! The best part of most of the mexican dishes I make is that they are inexpensive and I can use my own Homemade Taco Seasoning to save even more money. Most of the ingredients you probably already have in your cabinet, so this is an inexpensive recipe as well!

These seasoning is great because it doesn’t have all the sodium and you know exactly what goes in it. You can add it to tacos, burritos, enchiladas or any other mexican dish you can think of. It is also good if you add it to some ranch dressing for a little kick!  I would also recommend my sisters Easy Beef Enchilada Recipe!  Just add 2 heaping tablespoons and 1 cup of water to the browned hamburger and simmer for 5 minutes.

homemade taco seasonings

It’s also nice to decorate your kitchen with homemade spices and seasonings. I love the look of mason jars filled with different seasonings. It just adds that special good feeling of being in an inviting home to gather for meals. Now it’s time for you to make your own!!

Easy Homemade Taco Seasoning

Ingredients

  • 4 TBSP Chili Powder
  • 3 TBSP plus 1 TSP Paprika
  • 3 TBSP Ground Cumin
  • 1 TBSP plus 2 TSP Onion Powder
  • 1 TSP Garlic Powder
  • 1/4 TSP Cayenne Pepper (or a little more if you prefer it hotter)

Instructions

  1. Mix all ingredients together.
  2. Store in airtight container or glass jar.
  3. For use, add 2 heaping TBSP per 1 pound of meat with 1 cup water.
Schema/Recipe SEO Data Markup by Yummly Rich Recipes
https://themavensisters.com/easy-homemade-taco-seasoning/


Best Beef Enchiladas That The Family Will Love!

Easy Beef Enchilada Recipe

enchiladas

These are some of the best beef enchiladas that I have created! I have tested recipes here and there and I have found that this recipe suites us the best! They are packed full of ground beef, or I like to call meaty goodness, and topped with cheese that melts to perfection! I had a craving for them so I thought why not run to the store get all the things I needed and make them up!

I am so glad I did, because they turned out perfectly! Now my husband is a huge meat lover, he kind of thinks a meal without meat isn’t really a meal! So I packed them full of ground beef, so they are pretty large in size. NOW you can make them smaller to fit your taste buds! It is all your preference. We do use the low carb style tortillas, as my husband is diabetic! We try to watch the carbs on things but still allow for a tasty meal that satisfies his cravings. Recipe does work with regular tortillas as well.

best beef enchiladas

We topped these with some cilantro and then I grabbed the sour cream, because everything taste better with sour cream in my eyes! It truly was a great meal that filled us up. You can pair this with some mexican style rice or refried beans, guacamole, or whatever else your heart desires! Top them however you like, it is a blank canvas and just fit it to your flavor palate! 

Best Beef Enchiladas That The Family Will Love!

Prep Time: 20 minutes

Cook Time: 30 minutes

Ingredients

  • 1 lb ground beef (feel free to use more ground beef if serving a lot of people!)
  • 1/2 cup finely chopped onion
  • 1 can of green chilis (4 oz)
  • Tortillas (we use low carb ones)
  • Red Enchilada sauce
  • 1 cup sharp cheddar cheese
  • salt and pepper
  • Cilantro (optional)

Instructions

  1. First off preheat your oven to 350 degrees.
  2. In a skillet you want to start browning your hamburger, salt and pepper it with a little dash.
  3. When the meat is almost cooked through with a little pink left, add in your onions and green chilis, and finish cooking.
  4. Take your enchilada sauce and pour into a bowl.
  5. Then dip a tortilla into the enchilada sauce coating it, and put into a greased pan. Add in your meat mixture, and roll up the tortilla. Then repeat till all your meat mixture is gone.
  6. Once all your enchiladas are rolled up, add your shredded cheese on top, and put in the oven to bake till it is nice and golden brown. That should take 30-40 minutes.
  7. When done feel free to chop some cilantro and toss on top, adds a fun look and new flavor to it, or skip this step!

Notes

You can double and triple this recipe. We only have 3 people in our home so I don't make huge amounts, but feel free to double the recipe if needed!

Schema/Recipe SEO Data Markup by Yummly Rich Recipes
https://themavensisters.com/best-beef-enchiladas-family-will-love/


This recipe is really easy to make and I love how quick it can come together! Adam was out mowing so it was a surprise when he came in to see what was for dinner! I am all about delicious meals that look great but don’t take a super long time to make! 

Easy Ground Beef Enchilada Recipe

easy ground beef enchilada recipe

Look at that cheesy goodness! Doesn’t it make you want to go make these like right now?! I am ready to re-heat and eat these for lunch!!

Creamy Coleslaw Recipe – Quick to Whip Up!

creamy coleslaw recipe

This creamy coleslaw recipes is one that is tried and true for our home! I have been using this recipe for a few years now and absolutely love it! It reminds me a lot of the coleslaw from KFC, which is my absolute favorite place to eat coleslaw! Nothing beats fried chicken and coleslaw and a nice buttery biscuit! This creamy coleslaw is really easy to whip up, and once you mix it up you just let it sit in fridge for a few hours so it can do it’s magic and then enjoy your masterpiece!

My Mom Came To Visit

family time

My mom decided to come stay for the weekend, and I wanted to have quick meals that didn’t take a lot of time so we could enjoy her visit more. Clay loved getting to play with her and of course he ate up all the attention she would give him! It was a really awesome visit! Next time I think we will go up there way and go to the lake for a day, so Clay can play in the water!

creamy coleslaw

One night I made this quick and easy creamy coleslaw and paired it with some baked beans and did my bbq pulled beef (just 2 ingredients) for a meal. It turned out awesome! I just prepped the meat mid morning, tossed it in the oven and let it bake for the day. My mom slept in a little so while she was still sleeping I prepped the coleslaw and got it done, before she got up. So my dinner was ready before 7 am! 

Easy Coleslaw Recipe

Creamy Coleslaw Recipe – Quick to Whip Up!

Prep Time: 10 minutes

Total Time: 2 hours, 10 minutes

Ingredients

  • 1 bag of coleslaw mix (cabbage and carrot mix)
  • 1/2 cup mayonnaise
  • 1/3 cup sugar
  • 1/4 cup milk
  • 1/4 cup buttermilk
  • 2 1/2 tbs. lemon juice
  • 1 1/2 tbs. white vinegar
  • 1/2 tsp salt
  • 1/8 tsp pepper

Instructions

  1. In a bowl mix all your wet ingredients together, make sure it is well mixed.
  2. Then mix in your cabbage mix, and stir around.
  3. Cover the bowl and put in the fridge, and allow to set for at least 2 hours before it is served. The longer it sits the more the flavors come out. I try to do the morning of the day we want to eat it, so it has time.
  4. Serve and enjoy!
Schema/Recipe SEO Data Markup by Yummly Rich Recipes
https://themavensisters.com/creamy-coleslaw-recipe-quick-whip/

BBQ Pulled Beef If you are interested, you can check out my BBQ Beef Recipe, it is really delicious to make and is great for when you have company as their is little prep work and then you just let it bake and do it’s thaanng! Click here for that recipe, it is on my other site, ChicnSavvy Reviews!

Easy Creamy Cucumber Salad

Sour Cream Cucumber And Onion Salad – Delicious! 
creamy cucumber salad

In our house we love this Easy Creamy Cucumber Salad, it is a nice twist from the classic cucumber and onion salad. I find it has a bit of a less bite to it, which is what I prefer. This one has sour cream, you can find some recipes that use mayonnaise, but I prefer the sour cream recipe! I like to make this every now and again!

My mother in law gave us some cucumber and onions from her garden, so I thought this would be a great time to whip this recipe up! It is really easy to make and doesn’t take many ingredients! This is great recipe for family gatherings, bbq’s, and potlucks! 

Sour Cream Cucumber Salad

Sour Cream Cucumber Salad

Like I said above it is so quick and easy to make this, and feel free to add a little dill if you like it. I am not a huge fan of fresh dill so I always skip it!

Easy Creamy Cucumber Salad

Prep Time: 15 minutes

Ingredients

  • 2 Large Cucumbers - Peeled and Sliced Thin
  • 1 Large Red or White Onion Sliced thin
  • 2 cups sour cream
  • 1/4 cup vinegar
  • 2 tbs sugar (If you want more sweet do 1/4 cup)
  • 1 tsp Salt
  • 1 tsp pepper

Instructions

  1. Once you get your cucumber and onions sliced nice in thin you will set aside.
  2. In a bowl mix your sour cream, vinegar, sugar and salt and pepper together.
  3. Then mix in your veggies, and put in the fridge for at least 4 hours before serving. They taste better if they sit over night in fridge. It helps break them down a little.

Notes

I don't like my cucumber and onions to be that sweet, if you do add the 1/4 cup sugar like I said. You can always start at a little sugar taste, and then if you want more sweet add more later.

Schema/Recipe SEO Data Markup by Yummly Rich Recipes
https://themavensisters.com/easy-creamy-cucumber-salad/

As you can see it doesn’t take much to whip these up, it is just waiting for them to set in the fridge to do their magic! Letting them sit helps break down the cucumbers and onions so they soak up that delicious flavor and become a bit softer like they need to be. We always enjoy eating them the next day, but I know at times we just wait the 4 hours cause we have no will power! 

easy creamy cucumber salad

And there ya go, a delicious side the family will love! Also if you are looking for a classic cucumber and onion salad, click here for that recipe!

classic cucumber and onions

No Bake Cookie Bites

Enjoy Some Delicious No Bake Cookie Bites

No Bake Cookie Bites

Cure that sweet tooth craving with these easy No Bake Cookie Bites! I have a huge sweet tooth and chocolate is my absolute favorite. There are many recipes out there, but I experimented to see if I could find a perfect recipe for my household.

These No Bake Cookie Bites are the easiest treats to make! They are perfect for an everyday snack, a birthday party or an energy boost while hiking! The are packed with lots of fiber and just enough sweet goodness to keep your taste buds happy and begging for more.

Easy Cookie Bites

As you can see, even Haydyn loves them! She seems to have an intuition when I start gathering the ingredients to make this recipe. She runs to the kitchen and is begging for some before I am even done. I can’t blame her, because I like to eat a little before I actually refrigerate them too! It’s pretty safe to say that the apple doesn’t fall far from the tree there.

What I love about these super easy cookie bites is that you can do so many things with them. The recipe I am posting is my absolute favorite and the one I make most often, but below are some variations you make like. Just replace the m&m’s and semi-sweet chocolate chips for the following:

Dried cranberries and white chocolate

Milk Chocolate Chips and Peanut Butter Chips

Butterscotch chips and chocolate chips

Peanuts and chocolate chips

Almonds and dried cranberries

Sunflower seeds and chocolate chips

No Bake Cookie Bites

Ingredients

  • 1 1/2 cups of oatmeal (old fashioned or minute oats)
  • 3/4 cup of peanut butter (I use Jif but you can use your favorite)
  • 1/3 cup honey
  • 2 tsp of vanilla
  • 1/2 cup ground flax seed
  • 1/3 cup m&m's
  • 1/3 cup semi-sweet chocolate chips

Instructions

  1. Mix all ingredients in a medium sized bowl with a wooden spoon. After mixed well, refrigerate for 1 hour. Roll into balls and enjoy! I like to keep mine refrigerated all the time and eat them cold.
Schema/Recipe SEO Data Markup by Yummly Rich Recipes
https://themavensisters.com/no-bake-cookie-bites/

These are are very filling and satisfying. You can sneak extra nutrients in and your family won’t even know or have time to object. Now it’s up to you to figure out what your favorite recipe is!

Strawberry Poke Cake

Classic Strawberry Poke Cake

Strawberry Poke Cake

If you are looking for a refreshing and tasty dessert, you should make a Classic Strawberry Poke Cake!  I remember being a kid and going to Grandma’s and having this Classic Strawberry Poke Cake! I always wanted it, but never knew how and then several years ago my husband asked me to make it. I started asking around and found out this is literally the easiest cake ever to make!  If you don’t make this cake, you are missing out!


family

I decided to make the Strawberry Poke Cake this year for the 4th of July. As you can see in the photo above, I attempted to take a photo of my amazing family. I had a fantasy of providing you with an awesome 4th of July family portrait with all of us in our 4th gear, but this is the best I could get!  With Haydyn having a meltdown and my husband not wanting to be in the photo it’s a good thing we had some yummy cake to keep us happy for dinner!

Okay, back to that delicious cake! The best part about this cake is that you refrigerate it, so it is so nice and cold with each amazing bite.  Another great thing about the cake is that you can personalize it to meet your tastes. I use strawberry jello and add strawberries, but you could easily replace it with orange, cherry or anything else you like!

There are also many things you can do to spruce of the frosting if you want. I prefer good old fashion whip cream, but you may want to add some cream cheese to it or some fresh strawberries sent through the food processor.  No matter what you choose, I’m sure you won’t be disappointed!

Strawberry Poke Cake

Ingredients

  • 1 box of Duncan Hines white cake mix
  • 1 (3 oz.) box of strawberry jello
  • 1 cup of boiling water
  • 1 (8 oz.) tub of cool whip
  • Fresh fruit like strawberries or blueberries (optional)

Instructions

  1. Follow the directions on the box of cake mix and prepare as recommended. When cake is almost done baking, boil your cup of water and dissolve the strawberry jello in the water. When the cake is done, poke holes with a fork all over while it's still hot. Then pour your jello all over the top of the cake and allow to cool. Once cooled, put your cook whip all over the top. Add fresh fruit to the top if desired and place in the fridge. I like to refrigerate for at least 3 hours before eating. Enjoy!
Schema/Recipe SEO Data Markup by Yummly Rich Recipes
https://themavensisters.com/strawberry-poke-cake/


Simple Homemade Banana Bread

Calling all Banana Lovers, here is a great Simple Banana Bread Recipe
Simple Homemade Banana Bread

I am a huge banana lover, so I am always up for making a delicious and simple homemade banana bread when I get a chance! Adam, is not a fan of bananas, but it seems that Clay likes them, so we can enjoy all the banana bread together now! I had some bananas getting brown, so I thought what a perfect time to whip up some banana bread.

I am excited for later today at snack time, for Clay to try it and see if he likes it. He is really starting to experiment with foods now, so it will be his first time eating it. So far he really loves his breads, just like his mommy! I craved bread a ton when I was pregnant with him!

Easy Homemade Banana Bread

Easy Homemade Banana Bread

This is a really easy bread recipe, and you can also add in chocolate chips, nuts, or other dried fruits if you would like. I just did a basic recipe today, and maybe introduce chocolate to Clay at a later date! This does make a little bit of a smaller loaf, so it is great if you are not wanting a ton. It doesn’t rise incredibly high like some recipes do. 

Simple Homemade Banana Bread

Ingredients

  • 3 ripe bananas (peeled and mashed)
  • 1/3 cup melted margarine
  • 1 cup sugar (you can do 3/4 cup if you want less sweet)
  • 1 egg
  • 1 1/2 cups all purpose flour
  • 1 tsp baking soda
  • 1/4 tsp salt
  • 1 tsp vanilla extract
  • OPTIONAL - NUTS or Chocolate Chips ( I would do 1/2 cup if you want to add them)

Instructions

  1. Preheat oven to 350 degrees. I used my KitchenAid Stand Mixer, peeled the bananas, and let the machine mash up my bananas on low. If you don't have a mixer, then take a fork and mash them really good.
  2. Then you will want to add in the melted butter, sugar, and beaten egg.
  3. In a small bowl, put your flour, baking soda, and salt. Mix that well, and then slowly add dry ingredients into the mixer with wet.
  4. Lastly add in your vanilla extract.
  5. Once it is well mixed, you can mix in nuts or chips if you want. Then pour into a greased loaf pan and bake for around 45-1 hour.
  6. You want the top to be golden brown, and when you stick a toothpick through it comes out clean, or with little crumbs.
Schema/Recipe SEO Data Markup by Yummly Rich Recipes
https://themavensisters.com/simple-homemade-banana-bread/

simple homemade banana bread

I really love how this is a nice moist bread. You just have to make sure not to over-bake it or that will make it dry. I hope if you make it you all enjoy it like we are!


Hope you all have a great rest of your week, and weekend!