Creamy Coleslaw Recipe – Quick to Whip Up!

creamy coleslaw recipe

This creamy coleslaw recipes is one that is tried and true for our home! I have been using this recipe for a few years now and absolutely love it! It reminds me a lot of the coleslaw from KFC, which is my absolute favorite place to eat coleslaw! Nothing beats fried chicken and coleslaw and a nice buttery biscuit! This creamy coleslaw is really easy to whip up, and once you mix it up you just let it sit in fridge for a few hours so it can do it’s magic and then enjoy your masterpiece!

My Mom Came To Visit

family time

My mom decided to come stay for the weekend, and I wanted to have quick meals that didn’t take a lot of time so we could enjoy her visit more. Clay loved getting to play with her and of course he ate up all the attention she would give him! It was a really awesome visit! Next time I think we will go up there way and go to the lake for a day, so Clay can play in the water!

creamy coleslaw

One night I made this quick and easy creamy coleslaw and paired it with some baked beans and did my bbq pulled beef (just 2 ingredients) for a meal. It turned out awesome! I just prepped the meat mid morning, tossed it in the oven and let it bake for the day. My mom slept in a little so while she was still sleeping I prepped the coleslaw and got it done, before she got up. So my dinner was ready before 7 am! 

Easy Coleslaw Recipe

Creamy Coleslaw Recipe – Quick to Whip Up!

Prep Time: 10 minutes

Total Time: 2 hours, 10 minutes

Ingredients

  • 1 bag of coleslaw mix (cabbage and carrot mix)
  • 1/2 cup mayonnaise
  • 1/3 cup sugar
  • 1/4 cup milk
  • 1/4 cup buttermilk
  • 2 1/2 tbs. lemon juice
  • 1 1/2 tbs. white vinegar
  • 1/2 tsp salt
  • 1/8 tsp pepper

Instructions

  1. In a bowl mix all your wet ingredients together, make sure it is well mixed.
  2. Then mix in your cabbage mix, and stir around.
  3. Cover the bowl and put in the fridge, and allow to set for at least 2 hours before it is served. The longer it sits the more the flavors come out. I try to do the morning of the day we want to eat it, so it has time.
  4. Serve and enjoy!
Schema/Recipe SEO Data Markup by Yummly Rich Recipes
https://themavensisters.com/creamy-coleslaw-recipe-quick-whip/

BBQ Pulled Beef If you are interested, you can check out my BBQ Beef Recipe, it is really delicious to make and is great for when you have company as their is little prep work and then you just let it bake and do it’s thaanng! Click here for that recipe, it is on my other site, ChicnSavvy Reviews!

Must Have Toy! VTech Learn and Dance Interactive Zoo – Age 6 months to 3 years


A toy your kid will love! 
VTech Learn and Dance Interactive Zoo

When we were at the store we saw this VTech Learn and Dance Interactive Zoo toy, and Clay’s eyes just lit up when Adam hit the button. It started singing a song, and the joystick moves the monkey around, it was a have to buy item at that time! We let Clay hold on to it through the whole store and he just kept hitting the buttons and playing with it. Truly was the happiest boy on the planet I think! 

 Learn and Dance Interactive Zoo

Vtech Interative Zoo

This Learn and Dance toy is really fun. It has really nice bright vivid colored buttons that really draw Clay in! It offers fun songs for him to dance to, touch buttons to meet the zoo animals, a spinner, and more. The neatest thing about this is the joystick, you can manuever the little monkey around by moving the joy stick! It is really cool, I will admit I sat there and made the monkey dance a little! Your never to old to have a little fun! 

Can’t view, click here to watch on YouTube.

The one downfall is their in no volume setting, I wish it could be adjusted a little. It isn’t super loud just sometimes you want a volume up a little and other times it wouldn’t hurt to be a bit quieter! It is very light-weight so your kid should be able to pick it up and move it around easily. Now Clay he has no issue picking it up and will toss it here and there when he plays.


 VTech Learn and Dance Interactive Zoo

Ship

&

Shop:

If you are interested in buying this toy, you can look at your local stores to see if available or head over and shop online at Amazon

Easy Creamy Cucumber Salad

Sour Cream Cucumber And Onion Salad – Delicious! 
creamy cucumber salad

In our house we love this Easy Creamy Cucumber Salad, it is a nice twist from the classic cucumber and onion salad. I find it has a bit of a less bite to it, which is what I prefer. This one has sour cream, you can find some recipes that use mayonnaise, but I prefer the sour cream recipe! I like to make this every now and again!

My mother in law gave us some cucumber and onions from her garden, so I thought this would be a great time to whip this recipe up! It is really easy to make and doesn’t take many ingredients! This is great recipe for family gatherings, bbq’s, and potlucks! 

Sour Cream Cucumber Salad

Sour Cream Cucumber Salad

Like I said above it is so quick and easy to make this, and feel free to add a little dill if you like it. I am not a huge fan of fresh dill so I always skip it!

Easy Creamy Cucumber Salad

Prep Time: 15 minutes

Ingredients

  • 2 Large Cucumbers - Peeled and Sliced Thin
  • 1 Large Red or White Onion Sliced thin
  • 2 cups sour cream
  • 1/4 cup vinegar
  • 2 tbs sugar (If you want more sweet do 1/4 cup)
  • 1 tsp Salt
  • 1 tsp pepper

Instructions

  1. Once you get your cucumber and onions sliced nice in thin you will set aside.
  2. In a bowl mix your sour cream, vinegar, sugar and salt and pepper together.
  3. Then mix in your veggies, and put in the fridge for at least 4 hours before serving. They taste better if they sit over night in fridge. It helps break them down a little.

Notes

I don't like my cucumber and onions to be that sweet, if you do add the 1/4 cup sugar like I said. You can always start at a little sugar taste, and then if you want more sweet add more later.

Schema/Recipe SEO Data Markup by Yummly Rich Recipes
https://themavensisters.com/easy-creamy-cucumber-salad/

As you can see it doesn’t take much to whip these up, it is just waiting for them to set in the fridge to do their magic! Letting them sit helps break down the cucumbers and onions so they soak up that delicious flavor and become a bit softer like they need to be. We always enjoy eating them the next day, but I know at times we just wait the 4 hours cause we have no will power! 

easy creamy cucumber salad

And there ya go, a delicious side the family will love! Also if you are looking for a classic cucumber and onion salad, click here for that recipe!

classic cucumber and onions

KidKraft Amelia Dollhouse

Hours of Entertainment with this Fun Dollhouse

KidKraft Amelia Dollhouse

If you are looking for that perfect dollhouse, I highly recommend the KidKraft Amelia Dollhouse. When I was a little girl, I always dreamed of having a dollhouse like this. I always used a cardboard box and pretend it was my dream dollhouse. I can only imagine how much fun I would have had with a real dollhouse like this!

When Kaylyn was 5 we knew we wanted to get her a dollhouse. She was reaching that age when she was really interested in dolls and figured she would love her very own dollhouse. So we searched all over the internet. We knew we wanted a house that would fit regular sized dolls, not miniatures. We also knew that we wanted something that was easy to assemble and had accessories. Most importantly we didn’t want to break the bank. The KidKraft Amelia Dollhouse had everything we were looking for. The assembly took around an hour, it comes with 15 pieces of furniture and isn’t very expensive.

dollhouse

Play Time is Even More Fun

Kaylyn is now 9 and still loves to play with her dollhouse. I am sure with her getting older we only have a few more years that she is going to want to play. However, Haydyn isn’t even 2 so we know that she will get many years of entertainment out of it as well!

One of the things I really like about the KidKraft Amelia Dollhouse is that it has such nice graphics on it and it encourages creative playing. Your dolls can rearrange their furniture, take a ride on the elevator or take a nap in the adorable bed! I promise your kiddo’s won’t get bored playing with this dollhouse. Plus, if you dreamed of having your own awesome dollhouse when you were little, you can even enjoy some playtime yourself (with the kids of course).

No Bake Cookie Bites

Enjoy Some Delicious No Bake Cookie Bites

No Bake Cookie Bites

Cure that sweet tooth craving with these easy No Bake Cookie Bites! I have a huge sweet tooth and chocolate is my absolute favorite. There are many recipes out there, but I experimented to see if I could find a perfect recipe for my household.

These No Bake Cookie Bites are the easiest treats to make! They are perfect for an everyday snack, a birthday party or an energy boost while hiking! The are packed with lots of fiber and just enough sweet goodness to keep your taste buds happy and begging for more.

Easy Cookie Bites

As you can see, even Haydyn loves them! She seems to have an intuition when I start gathering the ingredients to make this recipe. She runs to the kitchen and is begging for some before I am even done. I can’t blame her, because I like to eat a little before I actually refrigerate them too! It’s pretty safe to say that the apple doesn’t fall far from the tree there.

What I love about these super easy cookie bites is that you can do so many things with them. The recipe I am posting is my absolute favorite and the one I make most often, but below are some variations you make like. Just replace the m&m’s and semi-sweet chocolate chips for the following:

Dried cranberries and white chocolate

Milk Chocolate Chips and Peanut Butter Chips

Butterscotch chips and chocolate chips

Peanuts and chocolate chips

Almonds and dried cranberries

Sunflower seeds and chocolate chips

No Bake Cookie Bites

Ingredients

  • 1 1/2 cups of oatmeal (old fashioned or minute oats)
  • 3/4 cup of peanut butter (I use Jif but you can use your favorite)
  • 1/3 cup honey
  • 2 tsp of vanilla
  • 1/2 cup ground flax seed
  • 1/3 cup m&m's
  • 1/3 cup semi-sweet chocolate chips

Instructions

  1. Mix all ingredients in a medium sized bowl with a wooden spoon. After mixed well, refrigerate for 1 hour. Roll into balls and enjoy! I like to keep mine refrigerated all the time and eat them cold.
Schema/Recipe SEO Data Markup by Yummly Rich Recipes
https://themavensisters.com/no-bake-cookie-bites/

These are are very filling and satisfying. You can sneak extra nutrients in and your family won’t even know or have time to object. Now it’s up to you to figure out what your favorite recipe is!

Infantino Compact Cart Cover – Comfort and Germ Protection!

Can use for shopping cart or a high chair

cart cover

When Clay was born, I knew when he was no longer in his car seat, we would buy him an Infantino Compact Cart Cover, to protect him from germs! I found this one at Walmart, and it was reasonably priced.  Then after finding out of his condition, and making sure we are extra careful about germs, it became a must!

Infantino Cart Cover

The Infantino Compact 2-in-1 cart cover is great for carts or using for high chairs at restaurants! It helps add a little comfort to the baby as well as protecting from germs. It is easy to transport as it folds up and can be carried like a bag, as pictured above. We use it for shopping at any store that has a cart, and when we go out to eat.

cart coverIf you think about it hundreds of people touch carts everyday, and who knows how clean their hands are and what germs are on it. Clay puts everything in his mouth right now, so I want to ensure he isn’t touching a lot of dirty things, then sticking them in his mouth.  For me it is a no brainer that I want a little extra protection for him, and this cart cover fits our needs!

On the back side once it is down in the cart, it offers a pouch where you can store something if you want. When it is not in the cart, that is where it folds up in and can then be carried like a bag. It is pretty handy!


The Cart Cover Has A  Strap to Hold Sippy Cup and A Teething Toy Attached! 

infantino teal cart cover

This is a really nice cart cover, it is easy to put on the cart, has a built in teething toy, strap to attach a sippy cup, plus pockets. I highly recommend this as a gift for a parent or for you to use on your own child. It is machine washable, which is awesome!

SHOP: 

If you are interested in this cart cover, they do offer different colors and prints if you are interested. I picked mine up online at Walmart.com, if you want to shop for one today!

Strawberry Poke Cake

Classic Strawberry Poke Cake

Strawberry Poke Cake

If you are looking for a refreshing and tasty dessert, you should make a Classic Strawberry Poke Cake!  I remember being a kid and going to Grandma’s and having this Classic Strawberry Poke Cake! I always wanted it, but never knew how and then several years ago my husband asked me to make it. I started asking around and found out this is literally the easiest cake ever to make!  If you don’t make this cake, you are missing out!


family

I decided to make the Strawberry Poke Cake this year for the 4th of July. As you can see in the photo above, I attempted to take a photo of my amazing family. I had a fantasy of providing you with an awesome 4th of July family portrait with all of us in our 4th gear, but this is the best I could get!  With Haydyn having a meltdown and my husband not wanting to be in the photo it’s a good thing we had some yummy cake to keep us happy for dinner!

Okay, back to that delicious cake! The best part about this cake is that you refrigerate it, so it is so nice and cold with each amazing bite.  Another great thing about the cake is that you can personalize it to meet your tastes. I use strawberry jello and add strawberries, but you could easily replace it with orange, cherry or anything else you like!

There are also many things you can do to spruce of the frosting if you want. I prefer good old fashion whip cream, but you may want to add some cream cheese to it or some fresh strawberries sent through the food processor.  No matter what you choose, I’m sure you won’t be disappointed!

Strawberry Poke Cake

Ingredients

  • 1 box of Duncan Hines white cake mix
  • 1 (3 oz.) box of strawberry jello
  • 1 cup of boiling water
  • 1 (8 oz.) tub of cool whip
  • Fresh fruit like strawberries or blueberries (optional)

Instructions

  1. Follow the directions on the box of cake mix and prepare as recommended. When cake is almost done baking, boil your cup of water and dissolve the strawberry jello in the water. When the cake is done, poke holes with a fork all over while it's still hot. Then pour your jello all over the top of the cake and allow to cool. Once cooled, put your cook whip all over the top. Add fresh fruit to the top if desired and place in the fridge. I like to refrigerate for at least 3 hours before eating. Enjoy!
Schema/Recipe SEO Data Markup by Yummly Rich Recipes
https://themavensisters.com/strawberry-poke-cake/


Simple Homemade Banana Bread

Calling all Banana Lovers, here is a great Simple Banana Bread Recipe
Simple Homemade Banana Bread

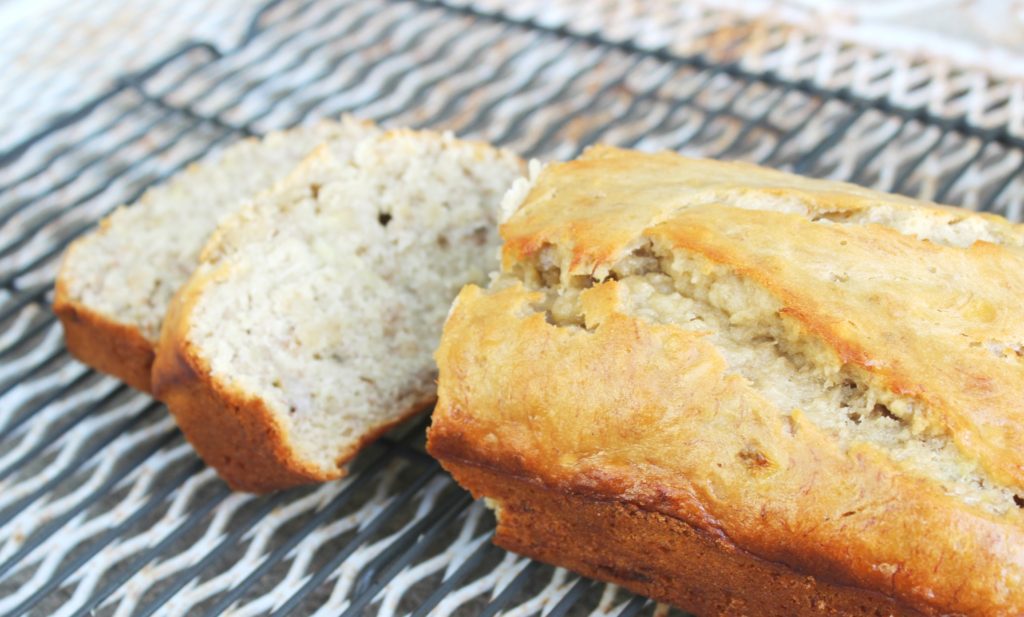
I am a huge banana lover, so I am always up for making a delicious and simple homemade banana bread when I get a chance! Adam, is not a fan of bananas, but it seems that Clay likes them, so we can enjoy all the banana bread together now! I had some bananas getting brown, so I thought what a perfect time to whip up some banana bread.

I am excited for later today at snack time, for Clay to try it and see if he likes it. He is really starting to experiment with foods now, so it will be his first time eating it. So far he really loves his breads, just like his mommy! I craved bread a ton when I was pregnant with him!

Easy Homemade Banana Bread

Easy Homemade Banana Bread

This is a really easy bread recipe, and you can also add in chocolate chips, nuts, or other dried fruits if you would like. I just did a basic recipe today, and maybe introduce chocolate to Clay at a later date! This does make a little bit of a smaller loaf, so it is great if you are not wanting a ton. It doesn’t rise incredibly high like some recipes do. 

Simple Homemade Banana Bread

Ingredients

  • 3 ripe bananas (peeled and mashed)
  • 1/3 cup melted margarine
  • 1 cup sugar (you can do 3/4 cup if you want less sweet)
  • 1 egg
  • 1 1/2 cups all purpose flour
  • 1 tsp baking soda
  • 1/4 tsp salt
  • 1 tsp vanilla extract
  • OPTIONAL - NUTS or Chocolate Chips ( I would do 1/2 cup if you want to add them)

Instructions

  1. Preheat oven to 350 degrees. I used my KitchenAid Stand Mixer, peeled the bananas, and let the machine mash up my bananas on low. If you don't have a mixer, then take a fork and mash them really good.
  2. Then you will want to add in the melted butter, sugar, and beaten egg.
  3. In a small bowl, put your flour, baking soda, and salt. Mix that well, and then slowly add dry ingredients into the mixer with wet.
  4. Lastly add in your vanilla extract.
  5. Once it is well mixed, you can mix in nuts or chips if you want. Then pour into a greased loaf pan and bake for around 45-1 hour.
  6. You want the top to be golden brown, and when you stick a toothpick through it comes out clean, or with little crumbs.
Schema/Recipe SEO Data Markup by Yummly Rich Recipes
https://themavensisters.com/simple-homemade-banana-bread/

simple homemade banana bread

I really love how this is a nice moist bread. You just have to make sure not to over-bake it or that will make it dry. I hope if you make it you all enjoy it like we are!


Hope you all have a great rest of your week, and weekend!

Fisher-Price Learning Home – Age 12 months and Up!

Having a blast with the Fisher-Price Learning Home

Fisher Price Play Home

This Fisher-Price Learning Home has so many fun features and will provide hours of entertainment and giggles! Our daughter, Haydyn, who is 20 months old, loves to play house for hours. Even our 9 year old, Kaylyn, loves to get in on the action.  The best part about this interactive toy is that Haydyn is learning and helping develop her vocabulary and doesn’t even realize it! Best for ages of 12 months to 3 years. 

Fisher-Price

When we purchased the Fisher-Price Learning Home, we were immediately drawn to all the bright colors.  There were so many different things to touch and play with to keep the girls busy. The swinging door is a huge hit! We also loved that it is very versatile because even though it is an inside toy, it can also be taken outside. We like to take ours out on a nice day and enjoy all the interactive features.

Fisher Price Interactive Home

The Fisher-Price Learning Home will not disappoint with all the activities available. There are 21 songs including The Itsy Bitsy Spider and Hickory Dickory Dock.  It helps teach the alphabet and the interactive clock can help the child learn how to tell time.  It even helps our 9 year old practice telling time and with today’s digital world we all need a little practice!  There are balls you can drop down the downspout, a mailbox and house numbers that you can change.  The porch light actually lights up and there are words with photos that helps encourage early reading and site words. Haydyn loves to look at the picture of the puppy and repeat the word puppy in her cute little toddler voice!

If you are looking for a fun and interactive toy that also teaches your child many things, the Fisher-Price Learning Home would be a great toy for your household!

Easy Slow Cooker Meatballs

Super Easy 3-Ingredient Slow Cooker Meatballs

easy slow cooker meatballs

One of our favorite family recipes is our Easy Slow Cooker Meatballs.  This is one of those recipes that has been passed down from a friend of a friend of a friend. We love meat at our house and can’t go wrong with this recipe! These Slow Cooker Meatballs are a perfect meal for any season. They are great for potlucks, bbq’s, graduations or any other event where people gather and share a meal.

I love that I can get supper ready before I ever even leave for work in the morning!  We are all busy and tired from our hectic lives. I have to plan ahead so that my evenings aren’t spent cooking. This gives me the freedom to spend time with my family and do all of our other chores without the stress.  The best part about this recipe is that it takes me about 5 minutes to prepare!

3 ingredient meatballs


Our daughter, Haydyn, could practically live off of these!  If you have a toddler you understand how difficult it can be to find food that they will actually eat.  These Easy Slow Cooker Meatballs are the perfect meal ticket for us. Finding meals that meet everyone’s needs is at the top of my recipe list.

As with most of my recipes, you can add different things or change things to make it your own. We love Sweet Baby Ray’s BBQ sauce, so we pretty much use it on everything. If there is a sauce you love, you can certainly use that instead. No matter what you do, you will fall in love with these tasty meatballs.  Pair them with some cream corn, fresh fruit and a slice of bread and butter and you have a quick and easy meal.

Easy Slow Cooker Meatballs

Ingredients

  • Bag of 64 count Cooked Perfect Brand Homestyle Meatballs
  • 1 (18 oz) bottle of Sweet Baby Rays BBQ Sauce Sweet'n Spicy
  • 1/4 cup of grape jelly

Instructions

  1. Line your slow cooker with a liner, pour in bag of meatballs. Pour entire bottle of BBQ sauce and 1/4 cup of grape jelly on top. Stir around. Cook on low for 6-8 hours.
Schema/Recipe SEO Data Markup by Yummly Rich Recipes
https://themavensisters.com/easy-slow-cooker-meatballs/